Interactable Objects
- nekiristailgame
- Apr 12, 2020
- 2 min read
Bryce Smrecek
For Nekiri’s Tail I created the interactable objects that would be used for puzzles. The way that I went about creating the interactable objects was using the form of coding in unreal engine 4 called blueprints. When it comes to creating the objects the way that it usually goes when designing them was deciding what they should do when receiving input. And when they should receive input. Which I will go over how I did this.
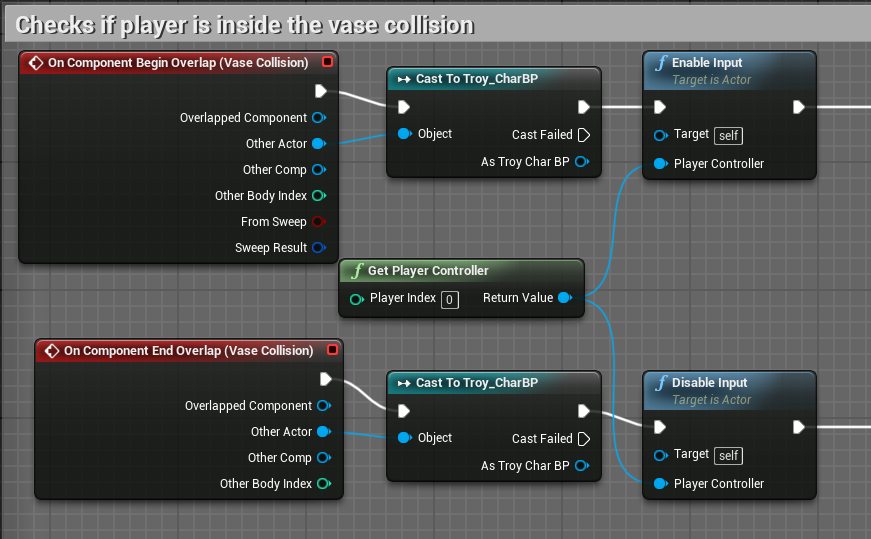
The main concern when creating the various interactable objects in the game was detecting when a player should be able to enter input, to activate an object. The way I went about setting this up was using hit boxes to detect when the player is inside the hit box. In unreal you can turn on or off input buttons in blueprints depending on when you want that specific object to receive input. So, my usually practice was to enable Input when a player enters the hit box and then disable input when the players leaves the hit box. I could have calculated the distance between the objects and the player to enable and disable input instead. But I choose to use hit boxes over calculating distance, because they are a much clearer bounds for when a player will enter them. Another component more specific to our game is that we have two different player characters. Each character has certain interactable objects that only they can interact with. The way I went about making sure a player character doesn’t interact with objects they are not supposed was to use the casting function in blueprints. Which means when a player enters a hit box, I can take the player who entered the hit box and cast them as the specific character. And if it succeeds that object can be interacted with. If it fails, then the object cannot be interacted with.


A common thing that pretty much all the interactable objects in our game share was some form of movement, when receiving input. Not specifically an animation that the object plays, but rather changing the rotation, location, or size of an object to move it. When it comes to making an object move in unreal’s blueprints, there exists a function called timeline. In the timeline function you can change a value over a set amount time. This value can be used to alter the location of an object by adding the value to the location of the object, making the object move over a set amount of time. Another benefit of using timelines is that you can reverse the timeline to restore an object to its previous state. Making it easy to reset an object to be used again. If you want more complicated movement from a timeline in unreal each timeline can return multiply different values each with their own set amount of time.


Comments